Sunday, 30 September 2012

Events in WPF

Events play an important role in handling user interaction in WPF. Event is a message sent  by the control that the program responds to by executing some application code. Each WPF control supports several events that can be handled.

Consider example below.

XAML

<Button Width="100" Height="30" FontSize="14" Content="Click Me" Click="Button_Click"></Button>

Code Behind

private void Button_Click(object sender, RoutedEventArgs e)
{
MessageBox.Show("You clicked me");
}

In above example, Click is the event that is supported by Button control. Button_Click is the event handler (function) in code behind where I have written code to be executed when button is clicked. When we click on the button, message box will be shown with text “You clicked me”.


Type of Events


Below picture will give a quick overview of type of events in WPF.
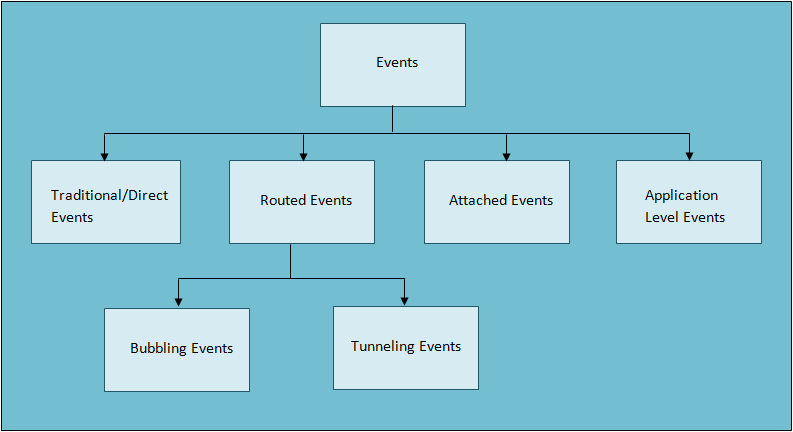

WPF Events


1. Direct Events: Direct events have been in existence since windows forms. Direct events are only raised by the control where the event originates.


2. Routed Events: Routed events can be raised by multiple controls in visual tree and can be handled by multiple handlers.


To understand routed event, lets first understand control hierarchy in WPF.


XAML

<Window x:Class="WPFEvents.MainWindow"
xmlns="http://schemas.microsoft.com/winfx/2006/xaml/presentation"
xmlns:x="http://schemas.microsoft.com/winfx/2006/xaml"
Title="MainWindow" Height="350" Width="525">
<Grid>
<ToolBar VerticalAlignment="Top">
<Button Width="100" Height="30" FontSize="14" Content="Click Me" Click="Button_Click"
Background="LightBlue"></Button>
</ToolBar>
</Grid>
</Window>

In above example, controls are arranged in hierarchal manner. Control hierarchy would be Window, Grid, ToolBar and Button. So button click event will be raised by Button, ToolBar, Grid and Window. Note: In above code we have specified click event handler for Button control only. We can also specify click event handler for ToolBar, Grid and Window which is explained in Attached Events section later in this post.


Routed events are of 2 types.


Bubbling Events: Bubbling events follow bottom - up approach and bubble up in the tree. Bubble events are first raised by the original/source control and then raised by the successive parent controls in the tree until the top level element (i.e window element ) is reached. In above case, Button control is the OriginalSource of the event. Hence Click event is first raised by Button control, then it is raised by ToolBar, Grid and Window.


Tunneling Events: Tunneling events follow top - down approach. Tunneling events are first raised by topmost control in the visual tree of original control, then raised by successive child controls until the OriginalSource control is reached. WPF Events with “Preview” keyword prefix to the event name are Tunneling events. Ex: Bubbling event “Click” has “PreviewClick” as tunneling event.


If we look at the function definition of Click event handler, RoutedEventArgs is passed as second argument. This object contains following event arguments.


Handled – Boolean value that Indicates that event is handled or not. Setting e.Handled = True means event is handled and will not be raised by successive controls.


Source - Control that raised the event.


OriginalSource - Source control that raised the event. Normally same as Source except some complex controls.


RoutedEvent - additional event related details.


3. Attached Events


So we have understood the concept of RoutedEvents. But in above example, how to specify event handler for parent controls like ToolBar, Grid and Window that does not provide Click event. This can be done Attached Events.


Attached events are the events that control can not define and raise by themselves, but still can provide handler for the events.


XAML

<Window x:Class="WPFEvents.MainWindow"
xmlns="http://schemas.microsoft.com/winfx/2006/xaml/presentation"
xmlns:x="http://schemas.microsoft.com/winfx/2006/xaml"
Title="MainWindow" Height="350" Width="525" ButtonBase.Click="Window_Click">
<Grid ButtonBase.Click="Grid_Click">
<ToolBar VerticalAlignment="Top" ButtonBase.Click="ToolBar_Click">
<Button Width="100" Height="30" FontSize="14" Content="Click Me" Click="Button_Click"
Background="LightBlue"></Button>
</ToolBar>
</Grid>
</Window>

Code Behind

private void Button_Click(object sender, RoutedEventArgs e)
{
MessageBox.Show("You clicked me");
}

private void ToolBar_Click(object sender, RoutedEventArgs e)
{

}

private void Grid_Click(object sender, RoutedEventArgs e)
{

}

private void Window_Click(object sender, RoutedEventArgs e)
{

}

In above code, ButtonBase.Click is the attached event.


4. Application Level Events


Application level events are related to application lifetime and provided by Application object. They are handled in App.xaml and App.xaml.cs. Below are the events that are provided by Application Class.


Activated - Occurs when window is displayed for first time and each time when we switch back from other application to our application window.


Deactivated - Occurs when we switch to other application.


Startup - Occurs when the application is started.


Exit - Occurs when application is closed or shut down.


SessionEnding - Occurs when window session is ending like computer shut down.


DispatcherUnhandledException - When unhandled exception occurs in the application.


Example - App.xaml

<Application x:Class="WPFEvents.App"
xmlns="http://schemas.microsoft.com/winfx/2006/xaml/presentation"
xmlns:x="http://schemas.microsoft.com/winfx/2006/xaml"
StartupUri="MainWindow.xaml" Activated="Application_Activated">
<Application.Resources>

</Application.Resources>
</Application>

Code Behind - App.xaml.cs

public partial class App : Application
{

private void Application_Activated(object sender, EventArgs e)
{

}
}

Saturday, 29 September 2012

Creating First WPF application

Let’s start by creating our first WPF application

Open Microsoft Visual Studio from Start Menu

Click File –> New project. Select “Windows” in Installed Templates and select “WPF Application” project type.

This will create below WPF project structure.

WPF Project Structure

Understanding Project structure of WPF.

Solution Name - FirstWPFProject. One solution can have multiple projects and class libraries.

Project Name - FirstWPFProject. This is our WPF project that contains project files.

Project Files:

App.xaml - This page is the entry point of the application. When application starts, App.xaml is called first which has reference to the window to be displayed. By default it reference to MainWindow.xaml

App.xaml.cs - This is code behind file for App.xaml page which contains application level events like Startup, Exit, Activated, Deactivated and DispatcherUnhandledException

MainWindow.xaml - This is a sample window added by default and displayed when application starts.

MainWindow.xaml.cs – This is code behind file of MainWindow.xaml to write application logic.

References: .net framework / external assemblies added to this project.

AssemblyInfo.cs - This file contains Information like title, description, product, company, signing and versioning that makes assembly self-describing.

Resources.resx – Resources.resx provide central location to store application resources like strings, images, icons, text files and access them in strongly type manner. Resources.resx files are also used for localization. By default, resources are embedded in project EXE or DLL but can also be complied into separate satellite assemblies.

Settings.settings - Settings are used to store information on user computer. Settings can be user preferences, address of web server, connection strings etc. Application level settings are constant for every instance of application regardless of user. Application level settings are read-only i.e they are defined at design time and their values can not be changed at run time. User settings are user-specific. User settings are read/write i.e they are defined at design time and their values can be read or write at run time.

Thursday, 27 September 2012

WPF Development Tools

Microsoft provides 2 main tools for WPF development. Microsoft Visual Studio and Microsoft Expression Blend.

Microsoft Visual Studio

Microsoft Visual Studio is tool used by developers to create WPF UI using XAML language and write application code using CLR compliant languages like C#, VB.net and others. To start with WPF development visual studio would suffice. Visual Studio designer provides basic XAML editing and viewing capabilities but lacks in advanced graphical abilities like styling, gradient effects, templating, animation.

Microsoft provides free education and evaluation version of visual studio called Microsoft Visual Studio Express. You can download it from Microsoft website.

Microsoft Expression Blend

Microsoft Expression Blend is a tool used by designers for creating rich and interactive XAML UI.

Microsoft provides an excellent integration between this tools. Same project can be shared between Visual Studio and Expression Blend. Hence developer and designers can work in collaboration. Designers can create rich UI in Blend and Developers can write complex application logic in Visual Studio.


Additional Tools - There are several other free, open source and paid tools available in market that help in better WPF development.

Debugging Tools

WPF Inspector – Excellent and useful tool. WPF Inspector is a utility that attaches to a running WPF application to troubleshoot common problems with layout, databinding or styling. WPF Inspector allows you to explore a live view of the logical- and visual tree, read and edit property values of elements, watch the data context, debug triggers, trace styles and much more

Snoop - Snoop WPF spying utility that allows to inspect Visual Tree of running WPF application and view/change properties, events, datacontext of selected elements in visual tree. Snoop displays list of running WPF applications. When user selects the application, snoop attaches itself to the selected application and displays visual tree of the application. Selecting an element in visual tree will display properties and events of selected element.

Mole - Mole is Visual Studio 2010 debugger visualizer (Plug - in) that makes it easier to debug WPF application. It runs inside Visual Studio 2010 while you are debugging. Mole allows to view

CRACK.NET - Crack.NET is a runtime debugging and scripting tool that gives you access to the internals of a WPF or Windows Forms application running on your computer. Crack.NET allows you to “walk” the managed heap of another .NET application, and inspect all values on all objects/types

WPF Performance Suite (Perforator, Visual Profiler) - Analyze the run-time behavior of your WPF applications and determine performance optimizations.

Productivity Tools

XAML Power Toys - XAML Power Toys can be installed as Visual Studio Plug-In. Power Toys are a set of commands that can be accessed using context menu (right – click) in XAML Editor and generate XAML code automatically for available features.

WPF Toolkit

XAML - There are lot of XAML authoring and viewing tools available on internet.

3D tools - WPF Graphics Tools, ZAM 3D, 3DPaintBrush

Third party WPF Components: Infragistics, Telerik, DevExpress, ComponentOne, Syncfusion, Xceed

SharpDevelop - free alternative to commercial Visual Studio

Other Useful links:

http://www.realsoftwaredevelopment.com/the-complete-list-of-xaml-tools/

http://blogs.msdn.com/b/mswanson/archive/2006/02/26/wpftoolsandcontrols.aspx

Monday, 24 September 2012

WPF Architecture

Before we jump into creating our WPF application, it's good idea to understand overall architecture of WPF, major components in WPF architecture and how components interact with each other.

Here is an overall architecture diagram of WPF.

As we can see in above diagram that WPF architecture is a layered architecture having Managed, Unmanaged and core operating system layers. Managed components are exposed as public API and Unmanaged components provides low level functionality of rendering WPF application.

3 major components in WPF architecture are as below.

PresentationFamework

PresentationFamework is a managed component. PresentationFamework sits on the top of architecture framework and is the primary API for creating WPF applications. PresentationFamework provides functionality that we need to build the WPF applications such as controls, data bindings, styling, shapes, media, documents, annotations, animation and more. When we create any WPF project, PresentationFamework.dll is added as reference by default.

PresentationCore

PresentationCore is a managed wrapper around Media Integration Layer and provides public interface for MIL. PresentationCore is the home for WPF Visual System and provides classes for creating application visual tree. The Visual System creates visual tree which contains applications Visual Elements and rendering instructions. Visual System does not render UI but passes rendering instruction, one element at a time to Composition System of MilCore through 2 way Message Transport. When we create any WPF project, PresentationCore.dll is added as reference by default.

MilCore

MIL in MilCore stands for Media Integration Layer. MilCore provides low level rendering functionality for WPF application. MilCore is written in Unmanaged code in order to enable tight integration with DirectX. DirectX engine is underlying technology used in WPF to display all graphics, allowing for efficient hardware and software rendering. MIL has Composition System that receives rendering instructions from Visual System and translates into data that can be understood by DirectX to render user interface.

I hope this article was useful to understand overall WPF architecture.

Saturday, 11 August 2012

WPF Overview and Features

WPF (Windows Presentation Foundation) is next generation Microsoft Platform for creating Rich client/desktop application. WPF was first introduced in .net  framework 3.0

WPF is successor to Windows Forms for creating desktop applications. However WPF has introduced major features compared to windows forms.

Below diagram shows WPF features in a nutshell.

WPF Features

In this article we will look at below 3 features of WPF while remaining ones will have their detailed posts.

1.  New Graphics System
Windows forms relied on 2 Windows components for rendering graphical user interface.
User32: Provides looks and feel similar to windows elements (buttons, textbox etc..).
GDI/GDI+: Provides drawing support for rendering shapes, images etc. but involved additional complexity.

These components has their own limitations.
Consider an example of creating a round glossy button or a button with gradient effect. Creating such button be require lot painting and would be hard to create.

WPF and DirectX
WPF does not rely on Windows API for rendering controls. Instead, WPF uses DirectX as underlying technology for rendering graphics. DirectX technology that has been used so far for developing gaming application with 3D graphics will now be used for developed business application using WPF. Hence is possible to create a rich client application that has 2D and 3D graphics.

Moreover each WPF control is rendered using borders, stokes, background fill, text etc. Hence WPF provides better control over what is renders and provides more flexibility of customization.

Hardware Acceleration
DirectX redirects the task of rendering graphics to Graphics Processing Unit, a dedicated processor in Video Card. Thereby CPU can be utilized for other tasks and application can take benefit of graphics capabilities of latest video card.

Comparison of graphical display system in both technologies

Winforms WPF graphcis comparision

2. Separation of Concerns
WPF provides clear separation between user interface design and application logic. User interface is designed using XAML, an separate XML based programming language. XAML can be created in Visual Studio or Expression Blend, an excellent tool for creating XAML based UI. Expression Blend is tool which is used by designers to create stunning WPF UI. Visual Studio is used by developers to write application logic using any CLR complaint languages like C#, VB.net etc. Moreover Expression Blend and Visual Studio can share same project. Hence designer and developed can work independently but in an integrated fashion.

Below is the screenshot of how UI code and application logic were tightly integrated in windows forms. Adding any control on the form or attaching an control event would create automatically generated C# code in code behind file. Hence there was a tight coupling between Form Designer and Code behind. Moreover primary tool for creating UI in windows forms UI was Visual Studio.

Winforms UI and application logic tight coupling

Whereas WPF provides as clear separation of XAML code and application logic as shown in below figure.

WPF Clear Seperation of Concerns

In above screen, Same project is opened in Visual Studio and Expression Blend. Initially, UI (XAML) and application logic are created using Visual Studio. Then after, XAML is modified in Expression Blend to apply linear gradient effect to button which can be done graphically and more easily in Expression Blend. This way designers and developers can work independently and can use the power of different tools to create rich application.

MVVM (Model, View, ViewModel) design pattern when used with WPF enables creating application with better separation of concerns and test driven development.

3. Resolution Independence
When we think of resolution independence, natural thought that comes to our mind is viewing an application under different resolution. WPF resolution independence has somewhat different perspective. WPF resolution independence means that an application when viewed in monitors with different size (12, 14, 15, 17, 20 inch monitor) and different pixel densities / dpi (dots/pixel per inch) should be displayed in same size (in inches).
Let’s first understand the concept of pixel densities and problem associated with that.

Pixel Densities
Pixel Densities is measured as number of pixel/dots per inch. Pixel Densities is knows as PPI or DPI. Pixel densities are calculated using screen resolution and monitor physical size. Higher the pixel density, better is the clarity.

Pixel Densities calculation for Laptop LCD Monitor
Resolution (in pixel): 1366 * 768 (width * height)
Screen Size (in inch):  15.5 inch diagonal. (13.5 inch width * 7.6 inch height).
Diagonal resolution: square root of [ (width x width) + (height x height) ]
                                  : square root of  [ (1366 * 1366) + (768 * 768) ]
                                  : 2455780 pixel
Pixel Density: 2455780/15.5 = 101.1 pixel per inch.
Nowadays we can find monitors, tablets and Smartphone's that have higher pixel densities of 120 dpi, 144 dpi, 200, 300 or even 400 dpi. In future we can expect LCD monitor upgraded with higher resolution and higher pixel densities. iPad2 and iPad3 are same size 9 inch. But iPad3 has 2048 * 1536 retina display resolution and iPad2 has 1024 * 768 resolution. Hence iPad3 has almost double pixel density than iPad2.

Problem
Let’s take an example of traditional pixel based application with 600 pixel width.
Laptop LCD Monitor with Pixel Density of 101 dpi would display this application in approx. 6 Inch (600/101) physical size/area.
But Advanced LCD or tablet with Pixel Density of 200 dpi would display this application in approx. 3 Inch (600/200) physical size. Hence application would be displayed smaller than original designed. We would expect that application would retain the size and take advantage of higher pixel densities to display sharper and better application.

Solution
WPF solved this problem by introducing new concept called device independent units. WPF controls size is specified using device independent units instead of pixel.
1 physical unit = 1 device independent unit * standard system dpi = 1/96 inch * 96 dpi = 1 pixel

Now we consider WPF application that is 600 device independent units in width.
Above mentioned Laptop LCD Monitor
Pixel Density: 101 pixel per inch.
Application size in device independent units: 600
Application size in pixel: 600 * (1/96 * 101) = 631.25 = 632
Application size in inch: 632/101 = 6.25 inch

Advanced LCD or tablet
Pixel Density: 200 pixel per inch.
Application size in device independent units: 600
Application size in pixel: 600 * (1/96 * 200) = 1250
Application size in inch: 1250/200 = 6.25 inch

As we can see from the calculation that In both LCD, physical application size remains same. Hence application would be displayed using same physical size even thought pixel densities are different. Hence application would look similar in both LCD. Only difference would be that application displayed in Advanced LCD or tablet would be sharper and better than normal LCD monitor.

I hope this post would give you a good start in understanding WPF. Keep watching this space for more such posts on WPF.